Thursday, August 1, 2013

REGENERATING NON-RECHARGABLE BATTERIES


© 2013 BOB SKIDMORE ALL RIGHTS RESERVED

BOB SKIDMORE

CORRESPONDENT


There was a time the only way you could save on battery replacement was to purchase special chargers and expensive rechargeable batteries. VIATEK has solved that problem with the RENU-IT PRO charger. Unlike the previously mentioned charging system and some other new designs now available, this one accepts Alkaline, Ni-Cad and Ni-MH, in five sizes: AAA, AA, C, D and the 9 volt block.

How does it work? Chemical reactions within the battery cause electrons to be stripped away from the carbon electrode. Electrons will try to flow from a battery’s negative terminal to its positive one, if allowed. As a battery discharges this cell gets “disorganized” as electrons get jumbled trying to make their way to the positive terminal. The RENU-IT PRO “reorganizes” the internal structure of the battery cell allowing it to be reused as much as 70 times.

(TIP: Batteries that show evidence of corrosion, as in sticky to the touch or a white powdery substance being visible, should not be recharged, but rather properly disposed of.)

The operation is very simple. Plug in the supplied electrical cord between the wall outlet and the charger. Since this is a 12-volt, 1 amp device, European use is possible with the proper line cord adapter. The unit should not be on at this stage. If it is, lift the clear plastic cover and press the ON/OFF button so that the display and various indicator lights are not lit. Insert up to 5 batteries you wish to charge with the positive (+) contact facing the control panel. You may mix any of the 5 sizes, but not the three chemistry types. For example, if you wish to charge alkaline type batteries all the batteries you wish to charge must be Alkaline, but they can be of different sizes.


(TIP: The battery holders use a movable L shaped arm. Since this arm is spring-loaded it requires some pressure to push back to accommodate the battery. The larger the battery, the more difficult this becomes, so be very careful not to force the arm as it could break. If that happens, that particular slot will be permanently unusable.)
 
Once all batteries are mounted in the charger, select the battery type by sliding the selector switch to the proper battery type.

(TIP: 9-volt battery status will not show up on the display, but will be indicated by the RED LED above the 9V port.)

Now, press the ON/OFF button. Indicator lights will now be lit in RED for charging, or GREEN for fully charged. A display panel shows the condition and charging stage of each of up to four batteries. Since Ni-CAD batteries have a memory that can adversely affect battery capacity when not fully discharged, the charger will automatically go into a discharge mode first and when full discharged, will start the charging cycle. The entire charging process can take between 1 and 10 hours, or more depending on the type and size, so be patient!

(TIP: The charging process should never be left unattended. Fires and explosions, while not common, are always a possibility.)

The RENU-IT PRO is a great money saving device. You probably have not heard about it before, as the battery companies want you to replace, not recharge batteries. Since all our gadgets use so many batteries this is a very practical device. Construction is reasonably good, but take heed to my tip regarding the L shaped loading arms. They could be the weak link in this device. Also, some batteries may not charge 100%, a nature of the battery and not the device.

(TIP: When possible always use the same brand and chemistry type of battery in a device. Mixing them can shorten the useful length of a charge.)

MSRP: $49.99

Available in stores, on-line and TV shopping networks. For more information go to: http://bit.ly/19iG3rL

GADGETEER’S RATING: *****

Bob Skidmore is a freelance writer, who may be contacted at bob.thegadgeteer.skidmore@gmail.com, or followed at twitter.com/bskidmore for the latest gadget industry news. He does not represent, or endorse any of the products he reviews and his opinions are solely his points of view and not those of the manufacturer. The manufacturer generally supplies products at no cost for the articles and no other compensation is received. THE GADGETEER is highly selective as to products he feels worthy of review so as not to waste the reader’s time, thus the reason for many superior ratings.

##


Monday, July 1, 2013

ARTISAN 50, A Printer That Prints On Discs


A Printer That Prints On Discs

© 2013 BOB SKIDMORE ALL RIGHTS RESERVED

BOB SKIDMORE

CORRESPONDENT


Recently I wrote about DISCUS, a software program designed for printing directly on CD’s & DVD’s. The question remaining is what printer works best for this process?

Several years ago DYMO introduced the DiscPainter, a compact printer whose sole purpose was printing on printable discs. This printer was even supplied with Discus as the recommended creation software. When I tested this printer at that time I found it to be best-in-class. In fact, it had little competition for small-run printing. Unfortunately, all good things come to an end and such was the case with the DiscPainter. RIP!

Today, many printers are available with the disc printing capability. They started appearing shortly after DiscPainter’s introduction and range from all-in-one to stand-alone models. The good news is that over time they’ve improved greatly! Gone are the jams and smeared ink issues that plagued these early models. The bad news, they’re still very clumsy, but, still the only game in town.

I’ve tested several stand-alone models from various manufacturers and settled on the Epson Artisan 50 for this article. I chose this stand-alone model over the all-in-one versions since generally the latter offers many multiple purpose features that are unneeded when the ultimate goal is to print on discs.

(TIP: Never attempt printing on discs that are not specifically intended to be printed on as the result will be smeared and the smeared ink will gum up the interior of the printer and could damage the print head as well. Also, avoid the use of generic ink as most printers are designed to reject them anyway and opened ink tanks can’t be returned. Exterior ink tanks exist, but use with caution as they, too can cause problems.)

The Artisan 50 prints on paper and on printable discs using 6 ink tanks, Black, Cyan, Light Cyan, Magenta, Light Magenta and Yellow. The use of individual ink tanks is a big plus as it reproduces truer colors and saves on ink replacement costs. The computer, software-to-printer, set up is a bit tricky. It’s not as simple as just selecting the printer set up menu and selecting common sense selections. Instead, certain substitutions are required to complete the task. This is an issue due to the lack of an industry standard.

(TIP: DISCUS, details the setup settings on their web site. http://bit.ly/ZVKPX Manufacturer supplied software leaves a bit to be desired concerning these settings and in many cases instructions are poor.)

Another issue you will face with most printers is that the tray used to insert the disc into the printer is a bit clumsy in operation. I found that the Artisan 50 uses a dual-purpose tray system. The first tray is either positioned for paper or repositioned for disc use. My test revealed that this tray should not be in either position prior to turning on the printer. Once powered up the printer will make noise and a green light flashes on the power button indicating it’s cycling up for some undetermined task. This can take as long as a minute or so. When this stage is completed the green light stops flashing, the noise ceases and you may attach the tray to the top slots as indicated for disc printing. Once again you will hear some noise until the printer has made all the necessary adjustments for accepting discs. As long as you do not switch printers in the computer menu, or power down either device you will remain good to go. Inserting a printable disc into the second tray and then inserting that tray into the first tray and matching the arrows on both trays, completes actual disc insertion. Printing multiple discs requires you to remove the second tray each time and reload a new disc. This entire process is tedious and time consuming and certainly needs to be addressed in future stand-alone models. It is my understanding that the all-in-one models from Epson do have a more user-friendly loading process. Why this was not incorporated in the Artisan 50 is a mystery. Printing is somewhat slow, but the results are spectacular! Always print on a disc after its been burned. If you print prior to burning you should wait 24 hours for the ink to properly cure to avoid smearing or scratching of the printed material.

(TIP: Test prints can be very useful. Save printable discs that were not recordable and use them for a test print. The same can be done with printed discs that were not to your satisfaction as you can use them for test burns.)

The print quality of the Artisan 50 is outstanding. Once you get passed the initial clumsy set-up, the print quality outweighs this negative since no better alternative exists unless you revert to costly professional printers by other manufacturers.

(TIP: Most manufacturers offer refirb models available from their on-line stores. Often times these units were returned for minor problems or operator error issues. The benefit to you would be a much lower price, possible free shipping, a detailed factory inspection and full warranty.)


MSRP: $149.99 NEW • $99.95 REFIRB when available

For more information go to: http://bit.ly/9z6Ufm

GADGETEER’S RATING: ****

Bob Skidmore is a freelance writer, who may be contacted at bob.thegadgeteer.skidmore@gmail.com, or followed at twitter.com/bskidmore for the latest gadget industry news. He does not represent, or endorse any of the products he reviews and his opinions are solely his points of view and not those of the manufacturer. The manufacturer generally supplies products at no cost for the articles and no other compensation is received. THE GADGETEER is highly selective as to products he feels worthy of review so as not to waste the reader’s time, thus the reason for many superior ratings.

##

Saturday, June 1, 2013

LABELING YOU CD's & DVD's


Fast, Safe and Professional….

© 2013 BOB SKIDMORE ALL RIGHTS RESERVED

BOB SKIDMORE

CORRESPONDENT


“The rumors of my death have been greatly exaggerated”. Sound familiar? Mark Twain said it well, but in this case it applies to CD and DVD media. It seems Apple has taken a position that such media is history, when no practical replacement exists. Note, I said practical! In my opinion CD’s & DVD’s will coexist when new practical storage formats evolve. To eliminate reader/writer disc drives from computers is a big mistake, but this is a topic for another article.

Label printing breaks down in two general categories; paper labels or direct media surface printing. Either is generally accomplished with specific label design software that is often included with a printer capable of printing on discs directly, or other printers that can only print on paper label stock.

(TIP: The use of paper labels, such as those made by a program known as CD Stomper, should be avoided. While they can produce beautiful labels, they can easily peel off over time due to the heat generated in the player or jam in the playback device and thus cause serious damage to the player. Address labels should  totally be avoided as they can cause an imbalance of the disc resulting in playback issues. Of course, there is always the felt tip marker, but how professional does that look?)

If you purchased a multi-purpose printer capable of printing on the disc’s surface, label creation software was probably included. My experience with such software supplied by Canon and Epson for example, left much to be desired. While you can create and design basic labels, the process is crude and can be time consuming to say the least, not to mention the amateur appearance. After much testing and hundreds of labels later, I found DISCUS, a dual platform program, created by Magic Mouse Productions, to be an excellent alternative to printer manufacturer supplied creation software.

DISCUS offers drag/drop and paste capabilities. It offers quick access to a library of commonly used symbols and a wide variety of backgrounds, and offers a large library of fonts. It also includes commonly used logos such as the DVD symbol. Size and position adjustments are quickly accomplished with the use of the cursor. Numerous effects are possible. Even a crosshatch design is provided that offers assistance in positioning graphics and verbiage. Label creation literally is fast. Changes are equally as quick to accomplish. Compatibility is limitless as it works with most printers and label stock, and you can easily adapt files to other printers since numerous models are supported. I will discuss printer results in next month’s article. Naturally, you can incorporate files from Photoshop and Printshop, too.

(TIP: Print settings on most printers is not what you think it should be. While simple when known, can be a frustration if you do not go to the DISCUS web site shown below for the explanation and exact settings.)

Label printing is a great way to maintain organization of your media library. If you produce software the end results are most professional in highlighting and promoting your programs. DISCUS is an outstanding software program. Stateside email supported by the creator results in a quick response. Domestic phone support is also available, but is provided on an “as time permits” basis.

(TIP: DISCUS is available as a download from the Magic Mouse web site. An optional disc copy is also available at time of purchase. I always make it a rule to purchase such backup discs in the event future availability disappears and you need to restore the program. DISCUS is not available in stores. It is, however, sometimes supplied with the purchase of certain printers.)

MSRP: $39.95 (incl. shipping) $5.00 for a disc copy (downloadable, FREE demos available)

For more information go to: http://bit.ly/ZVKPX

GADGETEER’S RATING: *****

Bob Skidmore is a freelance writer, who may be contacted at bob.thegadgeteer.skidmore@gmail.com, or followed at twitter.com/bskidmore for the latest gadget industry news. He does not represent, or endorse any of the products he reviews and his opinions are solely his points of view and not those of the manufacturer. The manufacturer generally supplies products at no cost for the articles and no other compensation is received. THE GADGETEER is highly selective as to products he feels worthy of review so as not to waste the reader’s time, thus the reason for many superior ratings.
##

Wednesday, May 1, 2013

CONTROLLING YOUR PRESENTATION AND COMPUTER WITH A RING?


© 2013 BOB SKIDMORE ALL RIGHTS RESERVED

BOB SKIDMORE

CORRESPONDENT


The wearing of a ring often times is considered a symbol of control. The RING PRESENTER is just such a ring in that it not only functions as a laser pointer, but also as a Bluetooth mouse.

The RING PRESENTER, by Genius, is a dual platform device that interfaces with your computer via a mini Bluetooth pico receiver that plugs into the USB port of a Mac, works well in the keyboard USB port, or PC. A rechargeable battery powers the ring. Charging takes place by connection of a supplied custom cable to the computer’s USB port or a USB charger and the ring. A blue LED serves as a power-on/off and when blinking, low power indicator. Once charged operation is quite simple. A three-position selector switch allows selection of mouse/pointer, off, or pointer only operation. A CD is provided as driver for those computers that require it. While the Mac had no problem recognizing the ring without the software installed, an upgrade from the Genius website was necessary to smooth out the mouse’s functions.

The ring is worn on the index finger of either hand. I’m right-handed and found the left index finger to work best. This allows my right hand the freedom of other unrelated tasks since the thumb of the hand wearing the ring interacts with the ring.

The ring has two control, top-side, locations, a center button and a surrounding faceplate. The center button is used for tracking the cursor and clicking the enter function. The faceplate has four switches each located in opposite positions of the square faceplate. They serve to activate all the normal functions of a mouse. When used as a pointer the bottom button serves to illuminate the pointer while depressed. Positioning your index finger at a right angle points the laser beam in the direction of what you’re pointing to.


(TIP: Operation is typically performed with the thumb of the hand wearing the ring on the index finger. Naturally, it is possible to activate these buttons with the opposite hand’s fingers, but you’ll probably find that the thumb method works best. Never look at the laser beam directly as severe eye damage or blindness can occur.)

The RING PRESENTER is an interesting gadget for those who do presentations, but can be used for normal computer use as well. Since your pointer and mouse are incorporated in one device located on a finger it’s easy to walk around the room and not carry two controls. It does take a bit of practice, however. If you’re one that shakes a lot the fact that you can easily steady your hand while operating the controls of the pointer could be a plus. The instruction book is minimal and hard to read due to an extremely small typeface. There’s what’s listed as a Window’s downloadable manual available on the web site that really works for Mac’s too since it refers to general functions.

MSRP: $69.99

For more information go to: http://bit.ly/YIM7sL

GADGETEER’S RATING: ***

Bob Skidmore is a freelance writer, who may be contacted at bob.thegadgeteer.skidmore@gmail.com, or followed at twitter.com/bskidmore for the latest gadget industry news. He does not represent, or endorse any of the products he reviews and his opinions are solely his points of view and not those of the manufacturer. The manufacturer generally supplies products at no cost for the articles and no other compensation is received. THE GADGETEER is highly selective as to products he feels worthy of review so as not to waste the reader’s time, thus the reason for many superior ratings.
##

Monday, April 1, 2013

CyberPower UPS, An Uninterruptible Power Source


CyberPower UPS,
An Uninterruptible Power Source….

© 2013 BOB SKIDMORE ALL RIGHTS RESERVED

BOB SKIDMORE

CORRESPONDENT


An Uninterruptible Power Source, UPS, is an electrical device providing emergency power and surge protection to other electrical devices such as a computer, when the mains power fails. It differs from a generator in that it will provide almost instantaneous loss protection from your local electrical power utility. It accomplishes this by energy stored in batteries commonly housed in a container with electrical outlet sockets, and a continuous charging circuit connected to the mains. This charging circuit detects the loss of electricity from the mains, sounds an alarm and automatically continues to power the device(s) connected to it. Naturally, the intent is not for you to continue operation of the device(s), but rather to allow ample time to power them down thus preventing possible data loss. The exception to this might be when powering low-power items such as routers, modems, and VOIP devices. Such gadgets might have the possibility of remaining operational for many hours or even days due to their low current draw.

(TIP: A UPS is commonly used for computers, data and telecommunications devices. It’s especially important with VOIP telephone modems allowing for continued operation since the electrical draw is minimal. Another application is with flat screen displays that are fan cooled, since post power shut-down requires such fans to continue operation for a couple of minutes until sufficient cool-down is achieved.)

UPS Power Sources come in various capacities and thus selecting the proper size is dependent on the sum total wattage of all the connected items. My tests were primarily for powering a VOIP such as the Vonage & Internet modem, a router, and a switch, a device that expands the number of router ports. After much research and testing, I chose a CyberPower CP600LCD 600va/340 watt model (100~140vac) since all these items are very low wattage.

Now, one might say, other than capacity, how different can one UPS be from another? Well here’s where the CyberPower CP600LCD shines. This model incorporates a multi-purpose, illuminated LCD meter indicating LOAD being consumed, INPUT voltage, OUTPUT voltage, BATTERY CAPACITY, and estimated RUNNING TIME, along with icons showing battery mode, overload condition, fault condition, and silent mode. All are  important features when the mains power fails. Other features include: USB port to PC, on/off switch, resettable circuit breaker, broadband network, phone ports and audible alarms for overload, battery power engaged, and low battery. Battery replacement is possible and easily accomplished. Expect about a two-year battery life span before replacement.

Like most other UPS’s, there never seems to be enough outlets. This model offers four back-up outlets and four pass-thru ones and is designed for horizontal, vertical or wall-mounted installation. When used with low-voltage devices power overload is generally not an issue. To over come the lack of sufficient outlets I used 2 triple cube taps. When properly configured they accommodate an additional 4 outlets and allows for the use of the oddly shaped power plugs generally used by such devices.


The CyberPower UPS system as tested offers the most bank for the buck! Well built, feature packed, and competitively priced makes it a great buy! Included is a “connected equipment” lifetime guarantee of $125,000.00, software and a 3-year warranty.

MSRP: $74.95

For more information go to: http://bit.ly/ZG759a

GADGETEER’S RATING: *****

Bob Skidmore is a freelance writer, who may be contacted at bob.thegadgeteer.skidmore@gmail.com, or followed at twitter.com/bskidmore for the latest gadget industry news. He does not represent, or endorse any of the products he reviews and his opinions are solely his points of view and not those of the manufacturer. The manufacturer generally supplies products at no cost for the articles and no other compensation is received. THE GADGETEER is highly selective as to products he feels worthy of review so as not to waste the reader’s time, thus the reason for many superior ratings. 

Friday, March 1, 2013

Reserve Power On-The-Go....


Reserve Power On-The-Go….

© 2013 BOB SKIDMORE ALL RIGHTS RESERVED

BOB SKIDMORE

CORRESPONDENT


We live in an ever-growing gadget world and with that comes the need for on-the-spot recharging of these devices. Naturally, there are many solutions out there, but what’s the most efficient and practical? Here are a couple that certainly meet the challenge.

ETI, Ecosol Technologies, Inc., of Canada, offers many recharging devices, two of which I have tested for this article. The first, PowerTrip, is a compact charger that can obtain a full charge from wall outlets via an internal folding plug (100~240 VAC 50/60hz), a supplemental charge through a USB port and a top-up via the built-in solar panel. It’s a feature that may just come in handy these days on cruise ships. With all these variables, PowerTrip can easily replace your OEM charger; in fact, it’s the only charger with its own battery. An iPhone 5 has a battery capacity of 2800ma making it possible to obtain several recharges from one fully charged PowerTrip. Special circuitry prevents over-charging and will shut down if any problem such as over-heating is detected in the device being charged. In addition, this charger also functions as a 4, 8 or 16gb memory device, depending on the model purchased, to store/transfer or back up important files from your computer.

(TIP: A built-in gauge shows remaining charge, charging taking place and recharging in progress.)


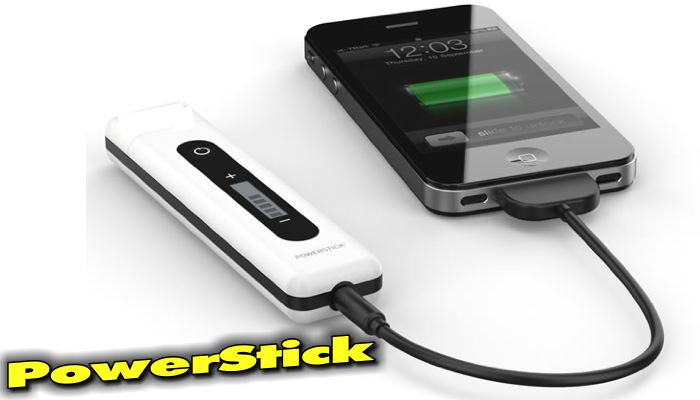
If you were looking for a truly pocket-sized, 40 grams, charging device, ETI’s PowerStick would certainly fit that need. (4.6”x1.3”x0.7”) It too, has a memory feature available in 2, 4 and 8gb versions. Having a 2300ma battery capacity, PowerStick can easily top off many smart phones and give tablets that extra boost in a pinch. Charging is accomplished by USB or an optional 5v/1.0a AC adapter that is not included.

(TIP: Re-charging times of either model vary depending on power source used. Multiple adapters and adapter cables are supplied to interface with most cellphones, PDA’s, MP3 players and tablets.)

I have tested both models and find them to exceed expectations. Their compact size, memory storage capabilities and built-in charging options make them an efficient and low cost, effective solution to your charging needs. Both are supplied with a soft travel case.

(TIP: An iPad PowerBinder version was introduced at this year’s CES Show in LasVegas. Product release is scheduled for late spring or early summer and we will be reviewing this model sometime thereafter. )

MSRP: PowerTrip: $109.00 – PowerStick: $49.50

Available on line worldwide with FREE shipping in the Continental U. S. and Canada on these models.

For more information go to: http://bit.ly/bK5Ut5

GADGETEER’S RATING: *****

Bob Skidmore is a freelance writer, who may be contacted at bob.thegadgeteer.skidmore@gmail.com, or followed at twitter.com/bskidmore for the latest gadget industry news. He does not represent, or endorse any of the products he reviews and his opinions are solely his points of view and not those of the manufacturer. The manufacturer generally supplies products at no cost for the articles and no other compensation is received. THE GADGETEER is highly selective as to products he feels worthy of review so as not to waste the reader’s time, thus the reason for many superior ratings.
##

Friday, February 1, 2013

PENCLIC, Reinventing The Traditional Mouse


Reinventing The Traditional Mouse….

© 2013 BOB SKIDMORE ALL RIGHTS RESERVED

BOB SKIDMORE

CORRESPONDENT


In 1981 the first integrated mouse intended for use with a personal computer was introduced by Xerox. Since that time there have been several variations including such devices as trackballs and built-in laptop/keyboard trackpads, but nothing revolutionary. Along comes PENCLIC, a Swedish innovative design, incorporating cutting edge technology that enables the extension of your hand’s movements to control the orientation of your computer’s cursor.

The name says it all. In the shape of a pen mounted on a small base or holder, the PENCLIC operates on most surfaces without any pad. It has controls mounted on the pen’s shaft for engaging left, right, middle, backward and forward clicking. A scroll wheel is accessible on the right topside of the base and a power on/off switch is recessed on the bottom. The button functions are based on HID 1.1 protocol supported by Windows and Linux. Apple has not implemented this standard, so only the left and right click functions will work. This should not be a problem for Apple users since you are accustomed to only using the left and right buttons anyway. At the moment, the best way to get the middle, backward and forward buttons to work on a PC is to program them. A free App site for this is: http://bit.ly/av8eBJ. As for MAC’s, you could try: http://bit.ly/m1Rfu. In either case, the PENCLIC works just fine for right and left click operation.


(TIP: PENCLIC, a right-handed user’s mouse, and is available as a wireless (R2) or wired (D2) device. The wireless version operates up to a distance of 15 feet, is supplied with a rechargeable NiMH battery that holds a 3-month charge, and incorporates an energy saving mode that kicks in after 10 minutes of non-use. Charging is via USB with a supplied cable. The PENCLIC will also accept an AAA non-rechargeable alkaline battery.)

PENCLIC supports all HID 1.1 operating systems including Windows XP or later, MAC OSX 10.1+ and most Linux/BSD systems. No software or special drivers are needed. It also works with Casablanca video editing systems, too.

(TIP: PENCLIC, may aid in the prevention of RSI, Repetitive Strain Injury, an injury of the musculoskeletal and nervous system that is caused by repetitive tasks, forceful exertions, vibrations and sustained or awkward positions.)

So, how does it work? You hold the PENCLIC like you would a pen, allowing your forearm and hand to rest on the work surface. The shaft portion rotates vertically & horizontally for maximum comfort. Holding left and right click buttons in for three seconds rotates a DPI sensitivity mode thru four selections. The base or PELCLIC holder acts like a traditional mouse, while your fingers grasp the PENCLIC’s shaft. The movement now resembles that of writing with a pen. Since the click controls are also mounted on the shaft your hand never leaves the PENCLIC. At first glance this all might seem a bit cumbersome, however, after an hour or so I found the speed, comfort and accuracy to be just fine. Over all, PENCLIC worked very well, made the mouse experience more comfortable and quite a bit more precise.

MSRP: Wireless (R2) or corded model (D2): $118.00

Available at retail and on line worldwide.

For more information go to: http://bit.ly/n94tkd

GADGETEER’S RATING: *****

Bob Skidmore is a freelance writer, who may be contacted at bob.thegadgeteer.skidmore@gmail.com, or followed at twitter.com/bskidmore for the latest gadget industry news. He does not represent, or endorse any of the products he reviews and his opinions are solely his points of view and not those of the manufacturer. The manufacturer generally supplies products at no cost for the articles and no other compensation is received. THE GADGETEER is highly selective as to products he feels worthy of review so as not to waste the reader’s time, thus the reason for many superior ratings.

##